
Installing J channel on metal siding is one of those projects that looks simple until you realize how much the details matter. A clean finish starts with good planning and the right mindset.
The channel does quiet, important work. It shields edges from rain and wind, stops water from sneaking in, and gives corners a polished look. Get it right, and your siding will look sharp for years.
Metal siding moves with temperature changes, so expansion and drainage need your attention from the start. Spacing and sealant choices will make or break the final result.
Take your time with measurements and fastening, and the rest follows naturally.
Gather Your Tools and Materials
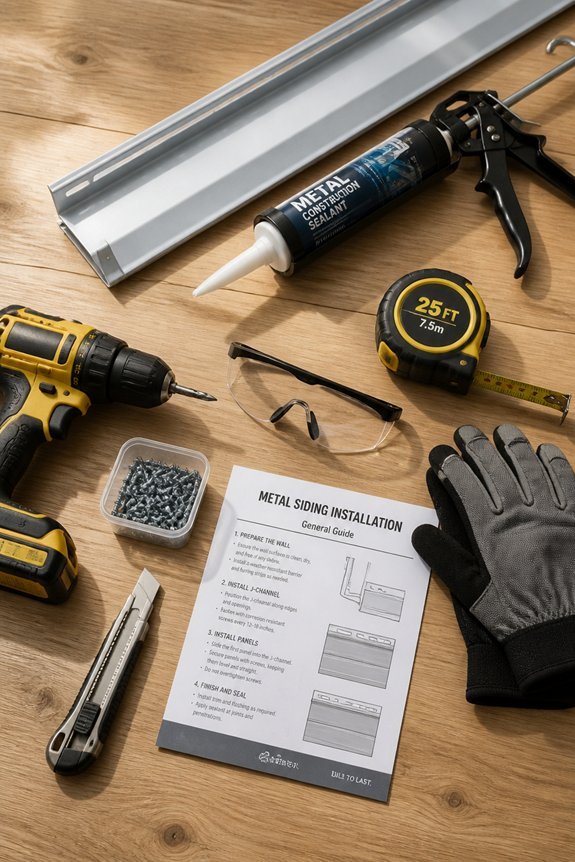
Several essential tools and materials are needed before beginning the J channel installation process.
A tape measure, level, and chalk line help guarantee accurate positioning. A circular saw or metal shears cut the J channel to proper lengths. You will also need a drill with metal bits to fasten components securely.
The materials are straightforward. Stock up on J channel, typically aluminum or vinyl, cut to your specifications. Exterior-grade caulk seals joints and prevents water from getting in. Stainless steel screws or nails, sized for metal siding, keep everything firmly in place.
Do not forget safety gear. Work gloves, protective eyewear, and a dust mask protect you during the job.
A ladder or scaffolding provides safe access to higher sections. Having a helper on hand makes holding materials steady much easier.
Measure and Plan J Channel Placement
Measure and Plan J Channel Placement
Accurate measurement forms the foundation of proper J channel installation on metal siding. Identify all areas that need J channel, including corners, window frames, door openings, and material transitions. Record horizontal and vertical dimensions for each section with a tape measure.
Planning starts with determining your material lengths and marking cut lines clearly. Account for metal siding expansion and contraction when placing small gaps. Sketch a simple layout diagram to organize sections and catch errors early. Double-check all measurements before cutting to save time and reduce waste.
Prep Metal Siding for J Channel Installation
Start with a clean surface. Remove dirt, debris, and loose paint with a wire brush or pressure washer. This gives you a solid base for the J channel to attach properly.
Check the siding carefully. Look for rust, dents, or any damage that could cause problems later. Treat rust spots with a converter or light sanding. Replace or repair damaged sections before moving forward.
Make sure everything is dry. Moisture trapped underneath leads to bigger headaches down the road. Take a moment to confirm the siding is straight and aligned. These simple steps prevent gaps, separation, and water from sneaking behind your new J channel.
Handle Corners and Inside Edges First
Corners and inside edges need attention before you tackle flat sections. These spots can be tricky, so it helps to know the right approach.
Outside corners call for mitered J channel. Cut two pieces at 45-degree angles and join them at the corner point. Inside corners work differently. Run full-length pieces that overlap slightly. This creates a channel for your siding to slide into.
Measure carefully for both types of corners. Account for the channel’s depth and width so everything fits right. Pre-cutting your materials saves headaches later.
Inside edges around windows, doors, and trim follow the same logic as inside corners. Secure everything with nails or screws spaced 16 inches apart. This keeps pieces stable and lined up.
Good corner prep leads to smooth siding installation and tight seals against the weather.
Fasten J Channel With Proper Spacing and Sealant
Spacing and Fastener Selection
Fasten J channel every 16 inches for consistent support. Choose corrosion-resistant nails or screws made for metal siding. Drive fasteners through the channel flange into the structure beneath. Tighten them just enough to hold firm. Overtightening cracks the channel or leaves gaps.
Sealant Application
Run sealant along the back edge of the J channel before you install it. Pick polyurethane or silicone sealants rated for metal. These flex with temperature changes without breaking their seal. Fill every gap between the channel and siding completely.
Final Inspection
Check each fastener head once you’re done. It should sit flush with the flange. Raised heads break the seal and let water in.
Check Alignment and Test Water Flow
Once fasteners are in place and sealant has cured, it’s time to check alignment and drainage. The J channel should sit flush against the metal siding. Look for gaps or twists along the entire length.
Use a level to verify vertical alignment. The channel needs to run straight down the wall surface without deviation.
Test water flow by pouring water along the top of the J channel. Watch how it moves. Water should travel smoothly downward without pooling or backing up.
Check that water doesn’t flow behind the siding. Corner joints and overlaps need extra attention. These spots often trap moisture.
Inspect the sealant around fastener heads and seams. Look for complete coverage without gaps. Fix any inadequate sealant before continuing.
Proper alignment and drainage protect against water damage, rust, and costly repairs down the road.
Frequently Asked Questions
What Is the Difference Between J Channel and Other Types of Trim?
J channel differs from other trim types by featuring a distinctive J-shaped profile that wraps around corners and edges. This design allows it to hold siding panels securely while providing a finished appearance, whereas other trims serve primarily decorative or protective functions.
How Long Does J Channel Installation Typically Take for an Average House?
Installation time varies based on house size and complexity. A modest home requires two to three days, a medium-sized residence demands four to five days, while larger properties need one to two weeks of dedicated labor.
Can You Install J Channel Over Existing Old or Damaged Siding?
Installing J channel over existing damaged siding is not recommended. Professionals typically remove old or deteriorated siding first to verify proper installation, prevent moisture accumulation, and guarantee structural integrity and longevity.
What Causes J Channel to Crack or Separate From Metal Siding?
Studies show thermal expansion causes up to 40% of J channel failures. Metal siding expands and contracts with temperature fluctuations, creating stress that cracks sealant and separates fasteners from the channel over time.
How Much Does J Channel Cost Compared to Alternative Trim Options?
J channel typically costs $0.50–$1.50 per linear foot, making it more affordable than vinyl trim or metal flashing alternatives. Aluminum J channel offers mid-range pricing, while vinyl options prove cheapest and steel trim most expensive.
Conclusion
Installing J channel on metal siding requires attention to measurement, preparation, fastening, and inspection. Like a puzzle’s interlocking pieces, each component—proper spacing, sealant application, and alignment—must fit together precisely. Following these procedures guarantees water drainage, prevents leaks, and protects the underlying structure. Homeowners who complete this task methodically establish a durable, weather-resistant barrier that functions reliably for years, maintaining the siding’s integrity and performance.