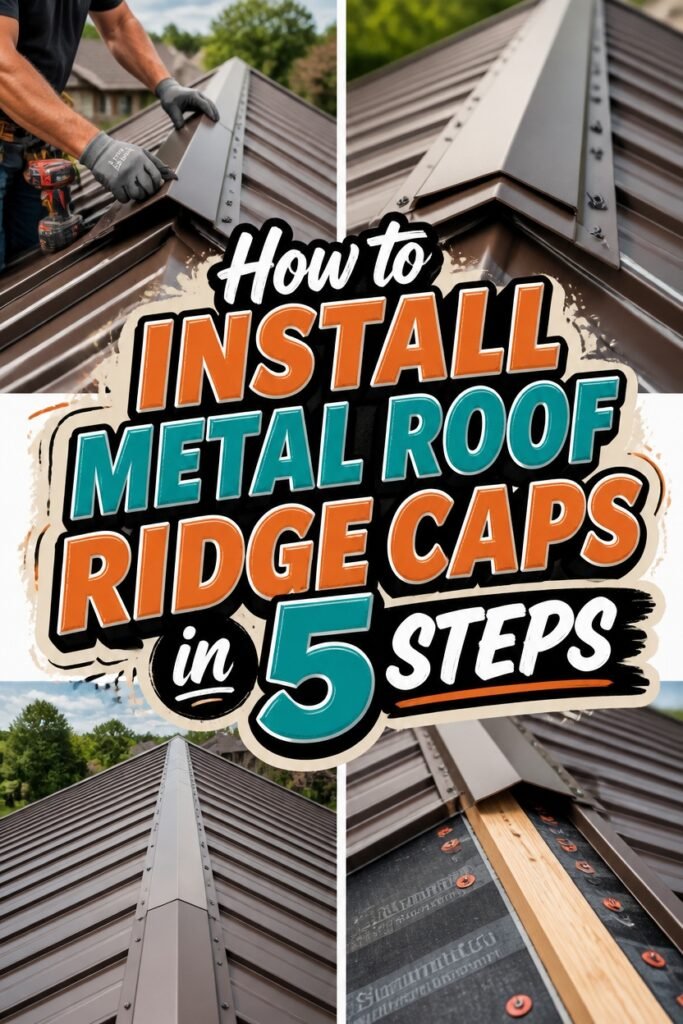
Metal roof ridge caps do the quiet, essential work of shielding your roof’s peak from rain and wind. This is where two slopes meet, and without proper protection, water finds its way in. A well-installed ridge cap keeps your home dry through every season.
The process breaks down into five manageable steps. You’ll gather your materials first, then measure the ridge line with care. From there, it’s all about positioning, securing, and sealing each panel so the entire system works as one.
Good installation comes down to patience and attention to detail. The right tools help, but so does moving slowly through each phase.
Take your time with fastener placement and sealing, and you’ll end up with a roofline that looks clean and stays watertight for years.
Gather Your Tools and Materials
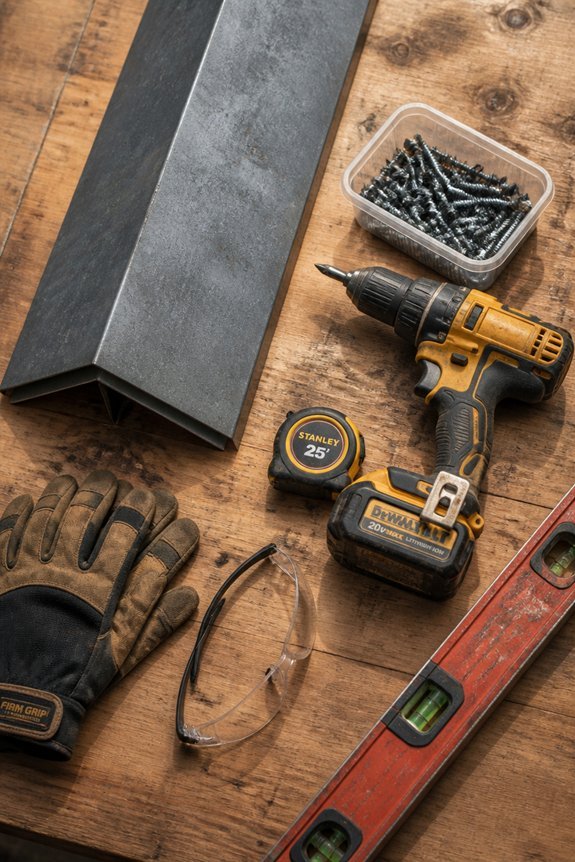
Start by collecting everything you need for the job. Essential tools include a tape measure, circular saw, and drill with bits. Don’t forget safety gear like gloves and eye protection.
A roofing hammer helps with fastening. A caulking gun applies sealant cleanly. A level keeps your ridge cap straight and true.
What You’ll Need on Hand
Pick up metal ridge caps that match your existing roof profile. You’ll also need roofing screws, quality sealant, and flashing tape. Choose stainless steel or galvanized fasteners so rust won’t become an issue later.
Drop cloths protect the lower roof from debris and spills. They save cleanup time once the work wraps up.
Get Organized Before You Start
Set up your materials and tools near where you’ll be working. This simple step cuts down on trips back and forth.
Check your inventory before climbing up. Running short on screws mid-project slows everything down. A quick count now keeps your workflow smooth from start to finish.
Measure the Ridge and Plan Your Layout
Start by measuring the full ridge length from end to end. Record this in feet and inches for accuracy. Ridge cap panels usually come in 10 or 12 foot lengths. Knowing your exact measurements helps you order the right amount of material.
Next, plan where your panel seams will land. Most manufacturers require 6 to 12 inches of overlap. Check your roof for vents, flashing, or other obstacles. Mark these spots on your plans before you begin. This step saves time and prevents mistakes during installation.
Install the First Ridge Cap and Set Your Pattern
Position the first ridge cap panel at one end of the roof ridge. Align it with the roof edge and make sure it sits flat against the peak.
Secure this panel with fasteners spaced to the manufacturer’s specs, usually every 12 to 18 inches. This first piece sets the pattern for all the others, so take your time to get it right.
Check that it overlaps the roofing material below properly. This creates a weathertight seal at the peak. Verify the panel is straight and level before you move on.
Good placement here prevents headaches later. Once this cap is locked in, you’ve got a solid reference for installing the rest.
Fasten and Seal Each Cap Across the Ridge
With the first ridge cap in place, you now have a solid reference point. Work your way across the ridge, fastening each cap panel to build a continuous weatherproof line.
Space your fasteners consistently, usually every 12 to 18 inches. Check your local wind codes and manufacturer specs to confirm the right spacing for your project. Stainless steel or galvanized screws hold up best on metal roofing.
Once each cap is fastened, run a continuous bead of silicone sealant along the overlapping seams. This step seals the joints where water could otherwise sneak in. Keep working methodically until you reach the far end of the ridge.
Good fastener spacing and thorough sealing protect your ridge against the elements. These details help your roof stay sound for years to come.
Verify Weatherproofing and Seal Any Gaps
Inspection and sealing are the final steps for a solid ridge cap installation. Walk the entire roofline to check each cap. Look for proper alignment, tight fasteners, and smooth sealant coverage. Spot any gaps between caps or along the ridge line. These need immediate attention.
Common trouble spots include overlaps, cap-to-roof joints, and fastener holes. Small gaps respond well to silicone or polyurethane sealant. Bigger problems may call for flashing tweaks or repositioning the cap itself.
Unsealed gaps invite serious water damage. Moisture seeps into attics and walls, spawning mold and rotting wood. Poor sealing also weakens wind resistance, risking blow-offs in storms.
Schedule one last check after rainfall. Fresh leaks show up clearly when surfaces are wet. Fix gaps right away to avoid expensive repairs down the road. A well-sealed ridge cap adds years to your roof’s life.
Frequently Asked Questions
What Is the Average Lifespan of Metal Roof Ridge Caps Before Replacement?
Metal roof ridge caps typically last 20 to 50 years, depending on material quality, climate conditions, and maintenance. Galvanized steel caps generally endure 20 to 30 years, while aluminum or copper versions often exceed 40 to 50 years.
Can I Install Ridge Caps Over Existing Asphalt Shingles?
Over 60% of roofing failures occur at ridge lines due to improper sealing. Installing metal ridge caps directly over asphalt shingles is not recommended; the existing shingles must be removed first to guarantee proper fastening and weatherproofing.
How Much Does a Professional Metal Ridge Cap Installation Typically Cost?
Professional metal ridge cap installation typically costs between $8 and $15 per linear foot, depending on materials, location, and labor rates. Total project expenses usually range from $1,500 to $3,500 for residential installations.
Should Ridge Caps Be Installed in Cold or Warm Weather?
Ridge caps are best installed during warm weather when sealants and adhesives cure properly. Cold temperatures can compromise material flexibility and bonding effectiveness, potentially leading to gaps and water infiltration issues later.
What Warranty Coverage Typically Comes With Metal Ridge Cap Products?
Metal ridge cap warranties typically range from 20 to 50 years, covering material defects and premature failure. Coverage often includes rust-through, paint deterioration, and fastener corrosion, though specifics vary by manufacturer and product grade.
Conclusion
The installation process, when executed properly, results in a roof that gracefully sheds water and weathers the elements effectively. Homeowners who complete these five stages—gathering materials, measuring accurately, positioning initial caps, fastening systematically, and inspecting thoroughly—establish a protective barrier overhead. Proper sealant application and gap closure guarantee the roof’s longevity, preventing moisture from finding its way into underlying structures.